Tutorial
Lets make a tutorial using the DialogSys. We first need to create the dialog on the application. After that, we go to Unity to make it happen there.
Will be a scene between 3 entities: one player and two npcs. The player will need to get some sword from one npc and reclaim access through a gate from another one npc. The Player will gain a friendship point by interacting with each one npc.
Making the dialog
-
Open the DialogSys.
-
We need to create 3 entities. On Entities tab, click on the button Add Entity three times. Those numbers you see in each entity node are their Ids.
Give them:- A Name ('Player', 'Siri' and 'Alexa'?);
- A Last name;
- Choose a Type (category), on this case 'Actor';
- Assign to them a avatar image putting a image file name on the field Picture. Put your avatar image files on folder '\images\entities\' (see more here);
- Give your entity a System Name, that will be used by your engine. Remember: system names must be unique for each entity;
- Set one them as the Player clicking on its avatar image (inside node area) and choosing Yes to the message that shows.
-
Lets create the dataset for friendship variable:
- On Datasets tab, click on Add Dataset Model;
- On the dataset model created, click on the action menu on the left of the empty object and add a Automatic variable. Name it 'friendship' (lowercase) and assign '0' to the value;
- Click on Apply Model to Nodes Entities and choose the npcs created (Siri and Alexa). If you go to Entities tab, you will see the datasets applyied to those entities;
-
Lets create a variable inside Global Variables:
- Click on the tab Global Variables. On Global Variable variable object, click on the action menu on the left of the empty object and add a Automatic variable. Name it 'got_sword' (lowercase) and assign false to the value;
-
Now it is time to create the dialog.
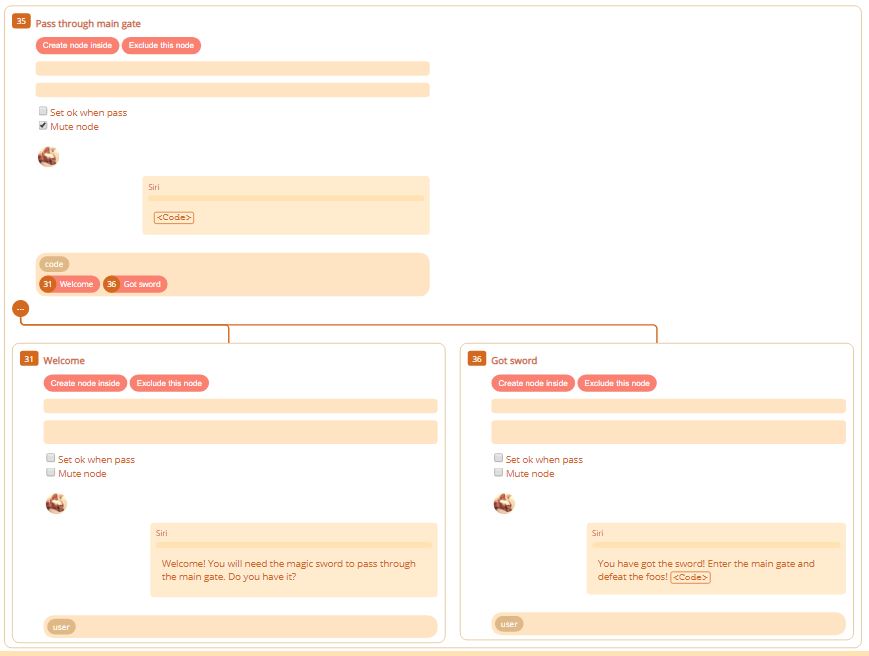
- On Main Data tab, create a node clicking the Create node button (below the main tabs). This node will be the main node for the 'Pass through main gate' conversation.
- Click on the title of the node ('Node X') and type 'Pass through main gate';
- Uncheck Set ok when pass;
- Check Mute node;
- Click twice on the Create node inside button to create 2 dialog nodes inside of it.
- On the first node created inside:
- Name its Title to 'Welcome';
- click on Condition to enter on this node and type the condition that will be required to be executed. Type:
g.got_sword == false
It means that if this variable is equal to false, will be shown the dialog that we will insert below.
Note: g is the reference of the global variable, and got_sword is a subvariable (attribute) of it. - uncheck Set ok when pass;
- click on the chat area (Place dialog lines and code here) to open a window to type the dialog.
- Click on Add Entity and select 'Siri'. A Add line button for Siri will be added to the botton of the window. Click on it to add a chat line to the conversation;
- click on the chat line text ('Example text..') and type:
Welcome! You will need the magic sword to pass through the main gate.
Do you have one?
click on Apply on the window oppened;
- On the second node created inside:
- Name its Title to 'Got Sword';
- click on Condition to enter on this node and type:
g.got_sword == true
- uncheck Set ok when pass;
- create a chat line for Siri:
You have got the sword! Enter the main gate and defeat the foos!
- create a code chat line:
ds( [id of Siri entity] , [id of dataset model on Siri entity], 'friendship', 1)
This will set friendship variable to 1 from dataset applyied to Siri entity.
-
Now we gonna create a 4th node on the root main area:
- Click the Create node button to create it.
- Put as Title: 'Getting the sword';
- Click on a blank area on the node using 2nd mouse button (usually right) and choose Change order - Down to move the node down/right in the list.
Also, you can do this holding Crtl button and clicking on the node until you see its outer border line dotted. Use the Right Arrow key on keyboard to move it to the right. Click outside the node to deselect it. - Uncheck Set ok when pass;
- Check Mute node;
- Add two dialog nodes inside of it clicling on Create node inside;
- On the 5th node created (inside 4th):
- Name its Title to 'Sword';
- Click on the chat area and add a chat line to the entity 'Alexa':
Here, take this magic sword. You need it to succeed your journey.
Press enter to get a new line and (on the same chat line), click on Code button ('<!---->') and type:
g.got_sword = true
ds( [id of Alexa entity], [id of dataset model on Alexa entity], 'friendship', 1)
Note: ds() function is one of many that you can use in your script. See here a complete list.
Click on Apply;
- On the 6th node created (inside 4th):
- Name its Title to 'Go through the gate';
- Uncheck Set ok when pass;
- Click on the chat area and add a chat line to the entity 'Alexa':
Now go pass through the main gate!
-
Now its time to test it. Go to Test and Debug tab and test your dialog.
A little bit more..
If you desire, you can jump to the this step and export your job. If don't, we will elaborate a little more ...
We will change the structures of the nodes a little by using Connections to orient where the conversation flow must go.
-
First, we will change Pass through main gate node and its content:
- Check Mute node field;
- Click on the chat area and add a code chat line (Code button ('<!---->') to the entity 'Siri':
if( g.got_sword == false ){ goTo(<id of 'Welcome' node>) }else{ goTo(<id of 'Got sword' node>) } - Click on Connections field (bottom of node);
- In Selection method set to Code;
- In Add connections, select 'Welcome' and 'Got sword'. Click Apply; It means that one of this node will be selected through goTo() function, according to g.got_sword variable.
-
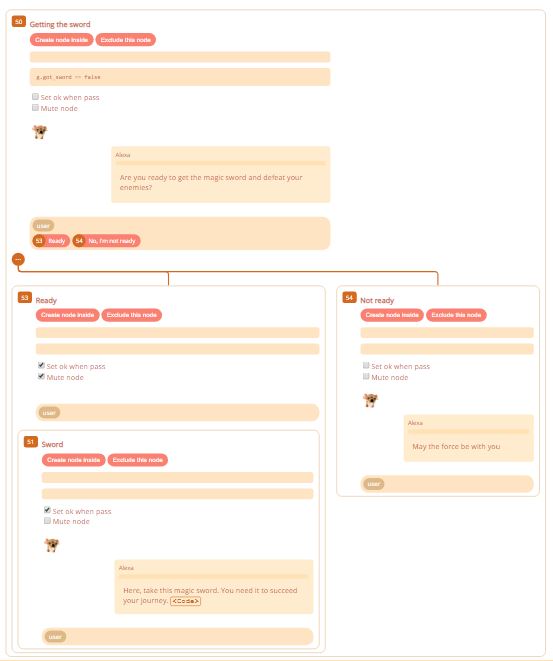
Now Getting the sword node:
- Uncheck Mute node;
- Put the following code on its Condition to enter on this node field:
g.got_sword == false
- Click on the chat area and add a chat line to the entity 'Alexa':
Are you ready to get the magic sword and defeat your enemies?
- Now it will be necessary create two nodes inside this main node. Name them Ready and Not ready;
- In Ready node, check Set ok when pass and Mute node;
- In Not ready node:
- Uncheck Set ok when pass and Mute node;
- Click on the chat area and add a chat to the entity 'Alexa':
May the force be with you
- Backing to Getting the sword main node, in Connections field:
- Set Selection method to User;
- In Add Connection, select Ready and Not ready nodes created;
- You can change the title of a connection just clicking on it. Click in the title of the Not ready node and change it to No, I'm not ready (this title will be shown to the user when those options appear). Click on Apply;
- With Sword node, check just Set ok when pass. Click with the 2nd click (right) over the node and choose Set as child of. Click over Ready node to choose it.
- With Go through the gate, click over the node and choose Set as child of and choose Root. This will make it a root node. Put the following code on its Condition to enter on this node field:
g.got_sword == true
This is how the three main root nodes will look like:

-
Now its time to test it again. Go to Test and Debug tab to do it.
-
If everything is ok, now we have to export the dialog to a XML file to be used by the engine. Click on Export in the header menu bar.
Now we go to...
Make it work on Unity
Now that we have our dialog exported to a XML file to be used by Unity, we go to open the engine make it happen there.
You have two options: you can create yourself a scene or you can use the dialog example scene file that comes with the plugin. If you prefer the first option, you have to set up the dialog on Unity yourself. See Setting your dialog on Unity. We will make use of the example file for this tutorial. Lets go.
- Open the example scene file dialog_example_scene.unity that come with the DialogSys Unity plugin.
- Lets set up the Player. Go to the Entities game object group and select Player game object. On Inspector, you will see the Entitiy Profile component. Change the System Name to the system name that you assigned on the dialog system app editor for the 'Player'.
- Do the same for two NPCs in the NPCs game object group, one for 'Siri' and other for 'Alexa'.
- In Main Canvas and EventSystem game object, inside Canvas, select DialogSystem prefab. On Inspector pane, DSysComponent component, put the path to the XML file exported on the application on the Path To XML File field. It's not necessary to change any other field.
- Then you can see the Build Entities button. Click on it to update the Entities Component list from the XML file. Go to this list and you will see Player, Siri and Alexa entities listed here.
- Following, you will need to put all avatar images that you assing to the entities on the Resources folder. See here how you can do it.
-
Now you need to update Main Game Data component with all variables on global variable and datasets that you declared on the application.
- Select the Main Game Data game object prefab on the root of the Unity scene. On Inspector, 2nd click (right button) on the Main Game Data component and selec Edit Script. The script will be open on a assigned code editor.
-
On the MainGlobaVariablesClass class, on the Data subclass, declare the bool variable got_sword:
public class MainGlobaVariablesClass { ... public class Data { public bool got_sword; ... -
Do the same with the dataset. Each dataset model needs to be declared. If your model dataset has as Id 1 or 2, just add the numeric variable friendship to the respective class already declared, ex.:
    public class DatasetModel_1
        {
            ...
            //It is preferable to declare numeric variables as float
            public float friendship;
            ...
Otherwise, you will need to make a entire declaration to the dataset model which id is different of those already declared there. See more details on how to do it here.