DialogSys
DialogSys its a solution to create dialog systems between entities (like actors, characters, storytelling elements etc). It can been used in games or other interactive media. Currently, it only can be inplemented on Unity platform.
Main Menu
On top of the head windows, you can see a usual menu bar with those functions:
New: Create a new file
Open: Open a existing DialogSys file
Save: Save the current data
Save As: Save the current data to a especific file
Export: Export current data to a XML so it could be interpreted by the DialogSys plugin in a engine.
Text to Translate: Export current chat lines to a .CSV (comma separated values) file to be opened on a sheet processor and translated to other languages
About: Infos about legal stuff, the app and the producer company
Node
What is a node?
The dialog and entity system is organized by nodes. Dialog nodes can hold chat lines, connections with other nodes, states, another dialog nodes etc, every elements that make the dialog between entities possible. Entity nodes are the entities itselfs. They have properties and another data sets that define every entity characteristic.
A node
As the filosofy of the dialog system is not just connect one node to another, but also hold one inside another, when necessary, to create a more nested and organized dialog structure.
A node can be inside other node when its just nested inside the parent node or connected to it.
Whats the difference? A connected node is a node that will be accessed by its previous node as a fruit of a choose, made by the system (randonmly), by the logic (code) or by the user (that has to make a selection).
A nested node its just a son node that will be executed after it's parent or siblings, and it is subordinated under the rules and state of its parent.
A connected node is not necessarialy inside another (making a parent-child relation). If it is already set as a connected node of another one, a node reference (link) is placed inside the connection area of the parent node that wants to hold the new connection node.
Dialog Roots
All dialog nodes that are placed direct on the dialog area (not nested) are Dialog Root nodes. Each one is the base node for a entire dialog conversation. The conversation on the dialog system happen from left to right. First, the system will get the far more left node that satisfy all conditions to happen, like entities that are included on that conversation or node conditions to be execute (in case it has one). Found that node, the system will execute it top to bottom until all child nodes (that are able to be executed) has been performed.
'Ok' State
When a node just finish to be performed, it will be marked as 'Ok', meaning that it was executed. When marked as 'Ok', it will not be performed again by the DialogSys on the engine. For exemple, when a actor B ask to the player: "Get sword X and come back here", maybe you want to mark it as 'Ok'. Next time the player interact with that actor, he should tell: "Have you got the sword X?", and that message must be repeated until the player execute that action. So its good let the 'Ok' not marked. You can do this by setting the 'Set ok when pass' option unmarked and set it via code when the desired condition is satisfiyed.
Code to perform logic between nodes
Javascript is the language to write all code on the system. To access variables, write conditions and general logic, you must use it inside a 'Code' field in the dialogs lines inside the nodes.
To access the global variables, you have to put it like g.variable, where 'g' represents the main global variable object.
Ex:
    g.vitality = 80
    g.mana = 30
    g.got_key_a = true

    if ( g.mana > 20) {
        <do something>
    }
This application not suport common Javascript expressions and structures like:
this
eval()
function()
function abc()
etc.
Those are not supported here.
JSON as data object
As we choose Javascript as the main script language, we also choose JSON (JavaScript Object Notation) as the main data format. JSON is a lightweight data-interchange format. See more here: json.org.
Script functions
Those functions will help get and set important data useful for the dialog flow.
ok( nid, param = null )
Sets or return the 'ok' state of a node. If param is null, will return the current 'ok' state.
nid: node id of the node.
param: a boolean value to be set.
Ex:
    ok( 2 )
    ok( 2, true )
write( text, params = null )
Writes something on the dialog line.
text: the text that will be writen, within the value holders ({0}, {1} etc).
params: the value or a array of values that will be writen on the text.
Ex:
    write( 'New {0} write {1}..', ['testing', 'function'] )
    write( 'The price of the item ' + g.item + ' is ' + g.price )
goTo( destinationNid )
If the node has node connections (and the connections field is set to 'code' behavior),
the goTo() function will go to the node that has the 'destinationNid'.
destinationNid: the id of the node that the flow of the dialog will follow.
Ex:
    goTo(64)
getEntity( nid, attr )
Return the attribute 'attr' for the entity that has the node id of 'nid'.
nid: node id of the entity.
attr: attribute that will be returned. Attributes: id, type, name, last_name, pic, system_name.
Ex:
    getEntity(1, 'name'), getEntity(17, 'hp')
getEntityBySystemName( sysName, attr = '' )
Return the attribute 'attr' for the entity that has the 'sysName'.
sysName: system name of the entity (may be singular for each entity).
attr: attribute that will be returned. Attributes: id, type, name, last_name, pic, system_name.
Ex:
    getEntityBySystemName('fooA01', 'name'), getEntityBySystemName('citizen07', 'name')
getPlayerAttr(attr)
Return the attribute 'attr' of the current player.
attr: the name of the attribute: id, type, name, last_name, pic, system_name.
Ex:
    getPlayerAttr('name'), getPlayerAttr('id')
ds( nid, mdid, prop, value = null )
Set or update a property from a dataset.
nid: the entity node id that the dataset is attached to.
mdid: the id of the model dataset (listed on the 'Dataset' tab).
prop: property to be returned or setted.
value: the value to be setted. If null, the ds() function will return the current value
of the given property.
Note: if the value is a string, it must be set as a quoted
string between simple or double quotes: "'abc'" or '"abc"'.
Note2: entity datasets can't access subattributes like 'armor.helmet', so you may not
use them. Otherwise, array elements can be accessed by the form 'armor[n]'.
Ex:
    ds( 20, 1, 'partners_id[2]', 1 )
    ds( 20, 1, 'vital', '[44,55]' )
    ds( 20, 1, 'born', '"VG"' )
dsModel( mdid, prop, value )
Update all datasets that is from the 'mdid' (dataset model id) to the value 'value' of the property 'prop'.
Ex:
    dsModel( 1, 'city', 'Damasco' )
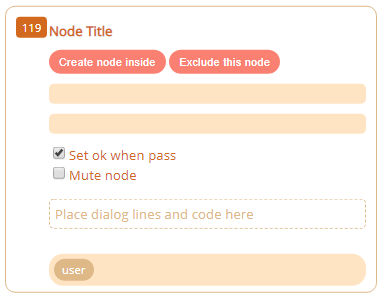
Parts of a Node
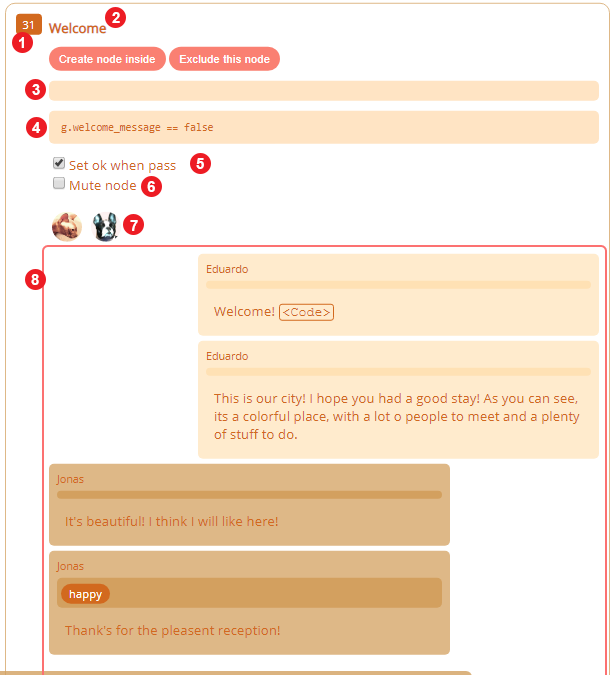
1 - Id
A singular number given to identify a node from others.
Maximize and minimize a node
Just click on the node id and it will toggle between max and minimize.
2 - Title
A name to distiguish better from others. Click on it to change it.
Create node inside
Click on it to create a nodo inside the current node. It will be added on the end of the parent node.
Exclude this node
Delete the node. It show two main options: 'Exclude just node': will exclude the node, maintaining what is inside of it: connected or nested nodes (if has some). 'Exclude node and parented content': will exclude the node and everything inside of it.
3 - Description
Describe characteristics of the node.
4 - Condition
A condition to enter on the node (writen in a Javascript code).
5 - Set ok when pass
If marked, when a node just finish perform, it will be marked as 'Ok'.
6 - Mute node
If marked, all chat inside a dialog line will not be showed to the user, only codes inside code fields will be performed, if it has some.
Note: making a parent node mute does not imply that its children also will be muted. The Mute node field affects only its node owner.
7 - Entities participating on the conversation
All entities that says something inside a dialog, appears here.
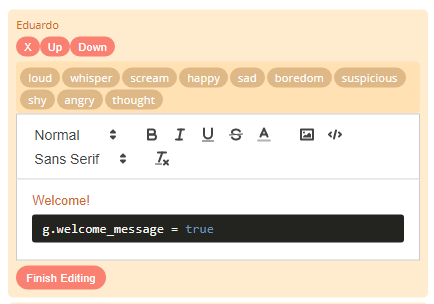
8 - Dialog lines
All dialog lines are placed here. You can format, insert code between the chat lines, rearrange lines order and so on.
To start adding/editing you just click on this area and a window will open .
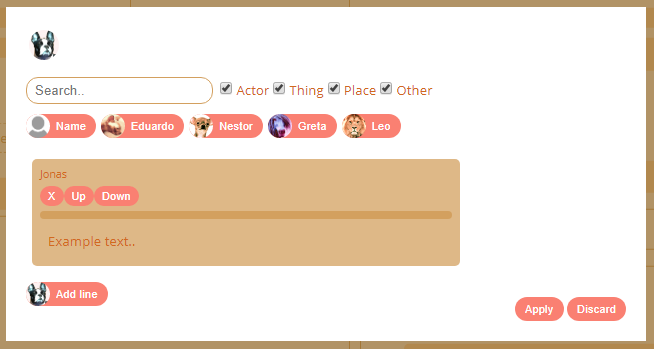
To choose a entity that will tell something, filter it using the search field or selecting its type (actor, thing, place etc). Click on the entity and it will be added to the bottom of the window. Click on the 'Add line'(with a image of the entity) to add a dialog line. To edit a dialog line, just click on it and it will open on a new window. After you finish, click on the button below 'Finish Editing'. Do the same to other entities to add dialog lines to them. After all dialogs done, click on the 'Apply' button to add it to the node. Warning: if you click on 'Discard' you will lose all editing that you have done.
9 - Node Connections
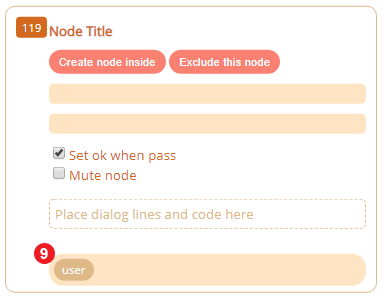
Basically, a connected node is a node that will be accessed by its previous node (a parent node) as a fruit of a choose, made by the system (randonmly), by the logic (code) or by the user (that has to make a selection). See more here.
Click at the field to edit the node connections. The follow window will open:
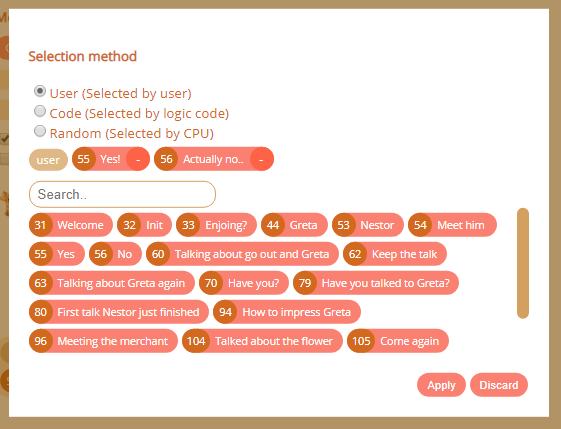
On the top, select the method of this connection. This method means how it will behavior.
User: means that the follow node (one that are in the connection) will be chosen by the user.
Code: the follow node will be decide using logic (code), writen on a dialog line.
Random: the system will choose what node will be the follow one.
On the following field you will pick all nodes that will be a option for the selection. You can filter on the 'Search..' field. Also, you can edit how the selection title will be presented by the user (if 'User' method was picked). Just click on the title of the selected nodes (above search filter field) and type the desired label. If you want to exclude a option, just click on the '-' of that option. Click 'Apply' to finish.
See a example:
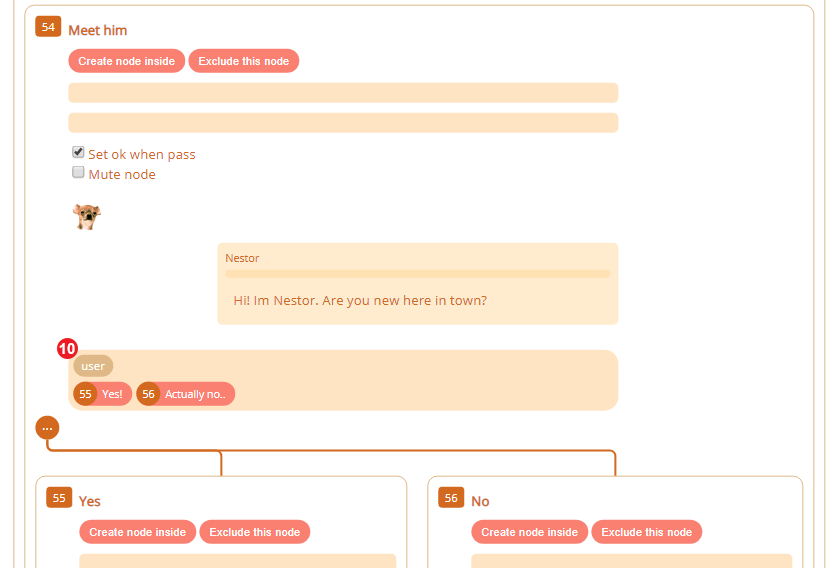
On this example, there are two connections nodes set, and the method is 'User'. In the final application, the user will be presented with two options: Yes and No (ids 55 and 56), and he will have to choose one. In case he choses the first, for example, the node 55 and all its content will be executed.
Zoon, Scroll, Pan
To scroll at the nodes area, use the mouse's wheel. Wheel up will scroll up, the opposite will scroll down. Holding 'Shift Key' and wheel up will scroll left, the opposite will scroll right.
To zoom, you need to hold 'Z' key and also use the mouse's wheel. Wheel up will zoom in, otherwise, will zoom out.
You can pan holding 'Z' key and drag the area using the mouse.
Maximize and minimize nodes
See Maximize and minimize a node.
Main Tabs
Below main menu, we had the Main Tabs:
Main Data
It is where the main dialog data is placed. All the structured dialog, interation, all codes to be executed, all hierarchie.. it is placed and organized here.
Entities
To exist a dialog, we need at least on dialog emmiter: we need entities. Those entities could be actors, characters, objects and even places. Whatever you want that can comunicate and chat with other thing is a entity. Here you can create, organize, give names, avatars, datasets and so much more on entities.
Entities attributes
- id: the entities id.
- type: could be one of them: actor, thing, place, other.
- name: the name of the entity.
- last_name: it last name, if it exist.
- pic: the name of the picture file (see more here).
- system_name: a choosen name that the entity could be accessed by it. This must be unique for each entity.
Pictures for the entities
To be assigned, all entities pictures must be on the subfolder \images\entities\, from the root folder where DialogSys application executable is. To assign a picture to a entity, just type the image file at the pic field of the entity node.
Global Variables
It is the main deposit that holds all global variables of your dialog system, or (if you prefer) of your entire final application (game). Global Variables (represented on code as the 'g' variable) is a object that can hold a bunch of another sub variables and can be accessed in the entire appliclation.
To create a sub variable (property) at the Global Variable ('g'), just use lower case letters, numbers and underscore. Always start with a letter. Don't forget to update your Main Game Data code with the changes that has been made here.
After all that, you will need put/update your Main Game Data on the engine. See Main Game Data for more information.
Datasets
Each entity, could have one or more sets of attributes (variables). For exemple several enemies share characteristcs, like vitality, magic or strength. You can define a set of this variables and apply on entities at once. You can apply default values to them and even can edit those attributes later.
To apply a dataset model to a entity just click on the button Apply Model to Nodes Entities of a model that will be applied. On the window that opens, choose the entities and click Apply.
If you made some changes on a dataset model, you probably need to update all datasets applied on your application. Click on the Update Datasets of that model.
After all that, you will need put/update your Main Game Data on the engine. See Main Game Data for more information.
Debug and Test
As the name says, here you can test and seek for bugs on your code. There are three columns (you can see all if your window application is wide enough on screen).
The first column is where you can execute the dialog. At the top, you can see the buttons that contains the main conversation trees. On top of it you can filter for a specic dialog.
The second ('Watch') holds all variables and see the changes as it happens during flow execution.
The global variables shows the content of the 'g' variable. The local, visible just for the node, represented by the 'l' variable. On the third column, you can see all entities and those datasets modifications as it happens.
Consider 'Ok' State
When marked, nodes marked as 'Ok' will be execute just one time. When not, a node can be executed more than once. Remember it is valid only on the Debug and Test enviroment. In the sistem performed inside the final engine, it will only consider the 'Ok' state of the nodes.
Side Search Tab
To search for a especific dialog node, use this tab.
Dialog Roots: the Dialog Roots avaliable. Select one to scroll to it.
Search on Dialogs: type a search term to seek for dialogs nodes that has that criteria. Select one result to scroll to it.