Setting your dialog on Unity
The version of this application was tested on Unity 18.4.
Example file
There's a example dialog game that comes with this application. You can use it to see how the dialog works and test your own dialogs on it if you desire. It has a scene, game objects, scripts.. all things necessary to run a basic game conversation enviroment. You can find it in the folder Example inside the Unity DialogSys application.
Getting started
First of all, you need to dowload the DialogSys plugin inside your Unity engine Package folder. Go to the download section, download and place it there.
To make it work, you will need to set your scene with all entities that you have created on the dialog and with the necessary components for the dialog system. Its a good idea to create a empty game object to hold all entities, including the player. Organize your scene in a way that makes it easy to access elements and configure the dialog system. The DialogSystem component name must be unique in the entire scene.
You will need to have a Canvas and a EventSystem game object on your scene. You could put them in a empty game object too.
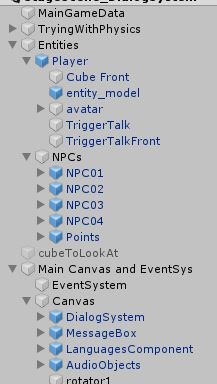
Example of the game objects structure on the scene for the entities and the dialog system
- From the DialogSystem folder plugin, in the Resources folder, grab the DialogSystem, MessageBox and LanguagesComponent prefabs and put them on the Canvas component.
- Also, you will need to grab the AudioObjectsPrefab and put it in your scene. It is a prefab containing a game object in a format prepared to hold all audio that the dialog system will need.
- On the DialogSystem prefab (placed in the scene), on the DSysComponent, set the path of the XML dialog exported file on the Path To Xml File field. You can rename the DialogSystemPrefab whatever you like.
- Enter the entities holder game object name created by you ('Entitites'?) on Root Entities GO Name.
- Its necessary to create a layer to put all DialogSys triggers game objects in the entities ('EntityTrigger'?). Create and indicate it in the Entity Trigger Layer Name.
- Assign the EventSystem game object in "Event System" field.
- Assign the game object that holds de Message Box Component: the game object Content, son of the MessageBox game object, on Message Box field.
- Assign the AudioObjectsPrefab to the Audio Manager field.
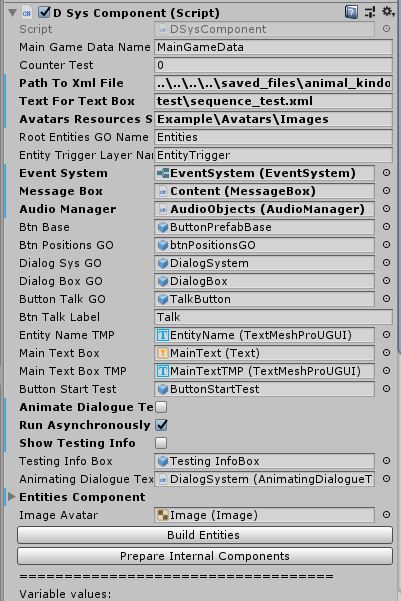
DSysComponent (DialogSystem prefab) Inspector
Those are the mandatory fields, others are personalizations that you can change to fit in the game style.
Some other options:
Animate Dialog Text: indicates that the chat text will be animated when goes appearing.
Run asynchronously: indicates that, in a multithreaded enviroment, allow the dialog to happen at the same time that another operations in the game, like when the player is chating with another npc, another npcs and other elements keep moving and operating in backround. DialogSys Unity plugin utilizes c# async operations to perform its actions. See more here.
Show Testing Info: shows development information for test purposes.
Now it's time to deal with entities...
Configure all triggers necessary in the entities. To see how, go to this section.
With all entities necessary for the dialog placed in the game scene, its time to click on the Build Entities - on the Dialog System Component (Inspector) - and all entities on the XML dialog exported file will be mounted and assigned to the Entities Component field. For each entity mounted on it, there's a created field called Game Obj, that could (yes, not mandatory) be filled with the correspondent entity game object placed on the scene.
Make it work on multiple scenes
You will probably make your game run on several scenes, with different entities on those scenes. Unity has a way to deal with multiple scenes using the SceneManager class. You can load and unload scenes inside others, placing components on 'father' scenes that can be used by its children ones.
First you need to create a father scene that will 'call' (load) other scenes when necessary. All data of the dialog system will be placed on this father scene, and on the scenes that will be loaded (children), you can place elements and diferent entities, in a way that fits in your game mechanics.
The code below is a example on how to load a scene and unload a previous one, after the first finished its loading process. :
using System;
using UnityEngine.SceneManagement;

...
asyncOperation = SceneManager.LoadSceneAsync(sceneToLoad, LoadSceneMode.Additive);
asyncOperation.completed += (asyncOper) =>
{
    SceneManager.UnloadSceneAsync(sceneToUnload);

};
...
Script execution order
To work properly, we suggest the following setup for Unity's Script Execution Order configuration for DialogSys script components:

Avatar pictures for the entities
All entity images that are used as avatars on the subfolder \images\entities\ from application folder must be copied and placed at the Unity aplication Resources folder. The default folder is Assets\Resources\Avatars\Images\ (you can change it on the DSysComponent (DialogSystem prefab) at field Avatars Resources Subfolder).
Triggers
Trigger Talk and Trigger Talk Front are both components that deal with observing other entities that are nearby or in front of the main entity talker (player). They perceive and starts the conversation. All game object entities, that will participate on the dialog, needs to have those two components.
Trigger Talk:
- Needs a Sphere Collider (marks Is Trigger to On and set the Radius value whatever you desire)
- Needs a Trigger Talk Component - Script (if it was the player, mark Can Talk By Myself)
Trigger Talk Front:
- Needs a Box Collider (marks Is Trigger to On)
- Needs a Trigger Talk Front Component - Script
Note: on the example that comes with this plugin and for our tests, all Player entities comes with its Capsule Collider inside Trigger Talk Front Component. Is Trigger is set to On.
TextMechPro (TMP)
DialogSys uses TextMechPro Plugin to deal with a more advanced text render formating. 'TextMeshPro is the ultimate text solution for Unity. It’s the perfect replacement for Unity’s UI Text and the legacy Text Mesh'. See more here.
Message Box
It's a dialog box that appears between dialog chats, indicating some additional info, like when the player get some new item.
Languages Component
It's the component to deal with the idiomns of your game. To works properly, you will need to translate the language file (.csv) exported from the DialogSys app. A CSV file is a delimited text file that uses a comma to separate values. After all dialog was defined on the DialogSys editor application, you can export all chat lines to a CSV file, open it on a data sheet software (like Excel, Google Sheet etc) and translate the text.
Verifications during conversation
Probably you will need make some verifications before or after a conversation happen, like see if a item was gotten or the player level got some specific value. We refering to the verifications that are made in the engine script, not inside dialog logic structure. Those variables/functions bellow allows us personalization necessary to do so.
Those structures are inside the DSysComponent.cs file.
Exec BEFORE print chat line
// Inside DSysComponent.cs file
public void execBeforePrintEveryChatLine(ref DialogSystem.ShowOffNode.ElementToPrint elToPrint);

// Defined inside DialogSystem lib file
public class ElementToPrint
        {
            public string textToPrint;
            public string entityName;
            public string entityImg;
            ...
        }
This function Will execute before print every chat line.
Parameter elToPrint is the current chat element processed (text line, entity name, etc) that will be printed. This parameter is passed as reference (see more about here). You can edit this function content to do whatever you need.
Exec AFTER print chat line
List<callbackToExecuteAfterEveryChatLine> callbacksToExecAfterEveryChatLine;
A list of callbacks to execute after the execution of every chat line print.
public void settingCallbacksAfterEveryChatLinePrinted();
The function where you can define those callbacks. They must be in the delegated Func design:
Func<bool>
and must return a boolean value. If returns true, the callback will keep been execute before every chat line. When it's returns false, will be removed for the list and stop executing.
Example:
Func<bool> callbackX =
    () =>
        {
            if (x > 0)
                return true;
            else
                return false;
        };

callbacksToExecAfterEveryChatLine.Add(new callbackToExecuteAfterEveryChatLine(callbackX));
Edit this function whatever you desire.
Adjust code inside chat lines before execution
DSys.callbackAdjustCode; //Inside the DSysComponent.cs file

public Func<string, string> callbackAdjustCode; //The source variable is inside DialogSystem lib file
A only one user defined callback (delegated Func) that allows adjustments of the code that are placed inside chat lines, before its execution. Must receive the code string as parameter and return it after adjustments.
Note: will be executed for ALL code scripts inside ALL chat lines.
Example:
Func<string, string> funcCode =
    new Func<string, string> ((string code) =>
    {
        //Do whatever you like..
        return code;
    });

DSys.callbackAdjustCode = funcCode;
Show messages to the user
// Inside DSysComponent.cs file
DSys.msgsToPrintVerifications;

// Defined inside DialogSystem lib file
public List<messageToPrintVerification> msgsToPrintVerifications;

public class messageToPrintVerification
{
    public Func<bool> function; //The function must return a boolean
    public String msg;
    ...
A list the verifications that is executed after a chat line is processed. The function of this is to show to the user messages between chat lines.
If some condition is satified, a message will be shown on the Message Box
public void settingVerificationsToShowMessagesAfterChatLines();
Setting the verifications (to show messages) that will be made when every chat line has processed to be printed. Edit this function whatever you desire. Example:
public void settingVerificationsToShowMessagesAfterChatLines()
{
    messageToPrintVerification msgToPrintVerif;
    String msg;

    // Messages for the project example...
    msg = "Greta got upset. You must find a way to please her.";
    // verifyFirstTalkToGreta is a callback function..
    msgToPrintVerif = new messageToPrintVerification(verifyFirstTalkToGreta, msg);
    DSys.msgsToPrintVerifications.Add(msgToPrintVerif);
    ...

public bool verifyFirstTalkToGreta()
{
    bool ret = false;
    ret = mainGameData.GlobalVariables.data.talked_to_greta;
    return ret;
}
Main Game Data
It is where all your entire aplication data (or at least the dialog data) will be placed inside the final engine. You can use the Main Game Data object as the only one centralized application data.
Set/Update Main Game Data
After all the dialog has been created, you will need put/update your Main Game Data object (inside the final engine) with the variables that has been declared/updated on your dialog. To do so, you can write the object on the code engine by yourself or use a tool conversor. To convert the data, you need to get the JSON (Javascript Object) from the Global Variables object and the dataset objects (that has been created by the dialog system application) and use a tool conversor, like one that converts JSON to C#, for exemple. (There are some online: json2csharp.com or quicktype.io)
Here you can see a example of the Main Game Data class file that you can use (Unity, C#).
To get the JSON, open the generated XML data exported to the engine on a internet browser (like Google Chrome or Mozilla Firefox), select the section that contains the JSON desired, copy and past it in the conversor tool. Now, copy the code generated and put it on the Main Game Object Data on the engine, making the necessary adjustments.
Remember: despite Javascript accept dynamic variables (variables that can change its type on the go), maybe the final language on the engine (C#, C++) probably not, so take care when assign values.
JSON on global_variable XML tag (inside json child tag):
...
<global_variables>
    <h2>Global Variables</h2>
    <p> code with the variables that has been declared here.</p>
    <w>
        <raw>
            <data>
            <first_talk_nestor>false</first_talk_nestor>
            <talk_to_greta_01>false</talk_to_greta_01>
            <talked_about_the_flower>false</talked_about_the_flower>
            <got_japanese_flower_seeds>false</got_japanese_flower_seeds>
            <testing>true</testing>
            <welcome_message>false</welcome_message>
            </data>
        </raw>

        <json>{"first_talk_nestor":false,"talk_to_greta_01":false,"talked_about_the_flower":false,"got_japanese_flower_seeds":false,"testing":true,"welcome_message":false}</json>

    </w>
</global_variables>
...
JSON on a dataset XML tag (inside raw child tag):
...
<datasets>
    <dataset did="1" mdid="1">
        <node_title>Dataset from Model 1</node_title>
        <button>Disable</button>

        <raw>{"magic":35,"location":123.567,"finance":0}</raw>

    </dataset>
</datasets>
...
Updating Main Game Data component
To update the Main Game Data component script, open it in a code editor and edit it as follows:
1 - Global Variables object
For Global Variables object, paste your class object converted here (converted?):
// Declare your global variables here..
public class MainGlobaVariablesClass
    {
        ...
Observe that the Global Variables class has a Data subclass. All variables will be setted inside of it. Generated subclasses could be appear if subobjects has been declared on the dialog editor. They will be declared side by side with the Data subclass, but all of them will be subobjects (when instatiated) of this Data subclass.
Note: it is preferable to declare numeric variables as float.
2 - Dataset objects
Dataset objects are a little bit more complex to update. Inside the DialogClassesOperatorClass class, there's the DialogClassesOperatorClass() constructor function. For each Dataset model declared on the application, a new line of the list of the datasets needs to be declared:
public class DialogClassesOperatorClass
    {
        ...
        public DialogClassesOperatorClass()
        {
            ...
            //Example for the dataset model which id is '1'
            ListOfDatasetClasses.Add(new DatasetClassListEntry( "1", typeof(DatasetModel_1)));
On the MainDatasetsToDialogSysDatasets() function set a foreach for each dataset declared:
// Foreach for dataset model 1
foreach (var DS in Datasets.ListDatasetModel_1) {
    act(DS);
}
The class MainDialogSysDatasetClass also needs to be updated. Observe that the function addElementToDatasetList() has 'if' for each model dataset:
// The class setted for the model datasets which ids are 1 and 2
 public class MainDialogSysDatasetClass
    {
        public List<DatasetModel_1> ListDatasetModel_1;
        public List<DatasetModel_2> ListDatasetModel_2;

        public MainDialogSysDatasetClass()
        {
            ListDatasetModel_1 = new List<DatasetModel_1>();
            ListDatasetModel_2 = new List<DatasetModel_2>();
        }
        public bool addElementToDatasetList(string mdid, string jsonText)
        {
            bool ret = false;
            if( mdid == "1")
            {
                ListDatasetModel_1.Add(JsonConvert.DeserializeObject<DatasetModel_1>(jsonText));
                ret = true;
            }
            else if( mdid == "2")
            {
                ListDatasetModel_2.Add(JsonConvert.DeserializeObject<DatasetModel_2>(jsonText));
                ret = true;
            }
            ...
It's time to declare the dataset models classes. Do it for each one. Observe that the __did variable is mandatory.
Note: it is preferable to declare numeric variables as float.
public class DatasetModel_1
    {
        //The variable __did is mandatory..
        public string __did;
        //Declare the vars here..
        //It is preferable to declare numeric variables as float
        ...
To finish it, it's necessary to update the DSysComponent component script. Open it in a code editor and go to the MainDatasetsToLocalDatasets() function. Add new lines for each dataset model created:
    public void MainDatasetsToLocalDatasets()
    {
        // A 'foreach' must be created for each dataset model..

        //Foreach for dataset model 1
        foreach (var DS in mainGameData.Datasets.ListDatasetModel_1)
        {
            act(DS);
        }

        //Foreach for dataset model 2
        foreach (var DS in mainGameData.Datasets.ListDatasetModel_2)
        {
            act(DS);
        }
        ...